Table of Contents
- Introduction
- Server information
- Configurations
- Instances management
- Front-end management
- Logs
- User and group management
- Maintenance
Introduction
The admin portal can be used to configure applications, manage front-end versions and inspect server logs.
To access the admin portal, navigate to https://<your-domain.com>/admin_portal.
The page loads and contains four collapsible panels that will be discussed in order of appearance in the following sections.

Server Information
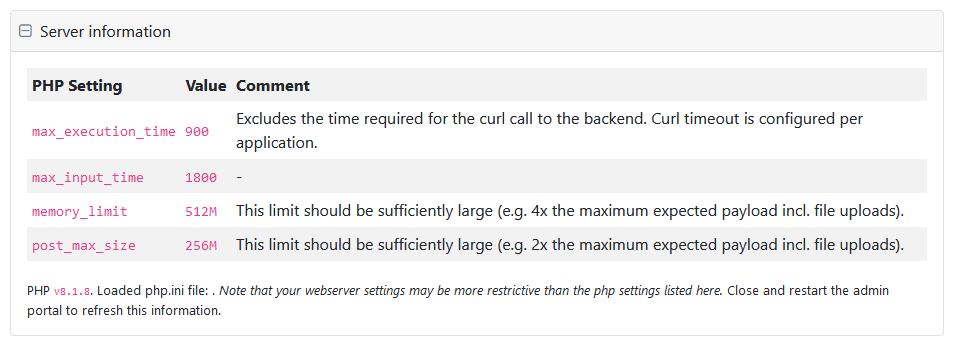
The server information panel shows some relevant PHP settings.

Configurations
The Configurations panel can be used to add, edit and remove configurations.

The configurations are shown in an edit grid, displaying the following columns:
- Status of the configuration in the admin portal, which can be:
- Unchanged, when the configuration has no unsaved changes.
- Modified, when the configuration has unsaved changes.
- Remove, when the configuration is marked for removal.
- New, when the configuration has never been saved.
- Enabled indicates whether the application can be seen in the user portal.
- Log traffic indicates whether traffic logging is enabled.
- Display name the name that is displayed in the user portal.
- Owner the application owner.
- Authorized groups authorized user groups.
- Back-end type the application back-end type.
Edit configuration
To edit a configuration, click the edit button on the far right. The configuration settings expand and can be edited. The following options are available.
- Enabled Select to show the application in the user portal.
- Display name Name as shown in the user portal.
- Application Slug Part of the URL that is unique for this application.
- Log traffic Select to log traffic.
- Front-end version override Applications define a front-end version, usually a production build of the same version used during development. This can be overriden here.
- Authorized groups Restrict access to the application to groups of users. Leave empty for unrestricted access.
- Application owner Name of the application owner.
- Application owner email Email address of the application owner.
- Description Description of the application shown in the user portal.
- Documentation URL Link to documentation pages.
- Back-end type Discussed in the section below.
Back-end type
Currently, four back-end types are available:
- MATLAB Production Server https://mathworks.com/products/matlab-production-server.html
- Python Azure Functions https://azure.microsoft.com/en-gb/services/functions/
- Python Azure Functions V2 Expects the response in the
returnValuefield, or in theerrorfield. In that case, the error message will be logged on the server and presented to the user in an error dialog. - Python FastAPI https://fastapi.tiangolo.com/
- Python Flask https://flask.palletsprojects.com/en/2.0.x/
- Python Flask V2 Expects the response in the
returnValuefield, or in theerrorfield. In that case, the error message will be logged on the server and presented to the user in an error dialog. - Python ownR https://functionalanalytics.nl/
Each back-end type has some specific settings, that will be discussed in the relevant sub-sections.
The back-end settings are grouped in three categories:
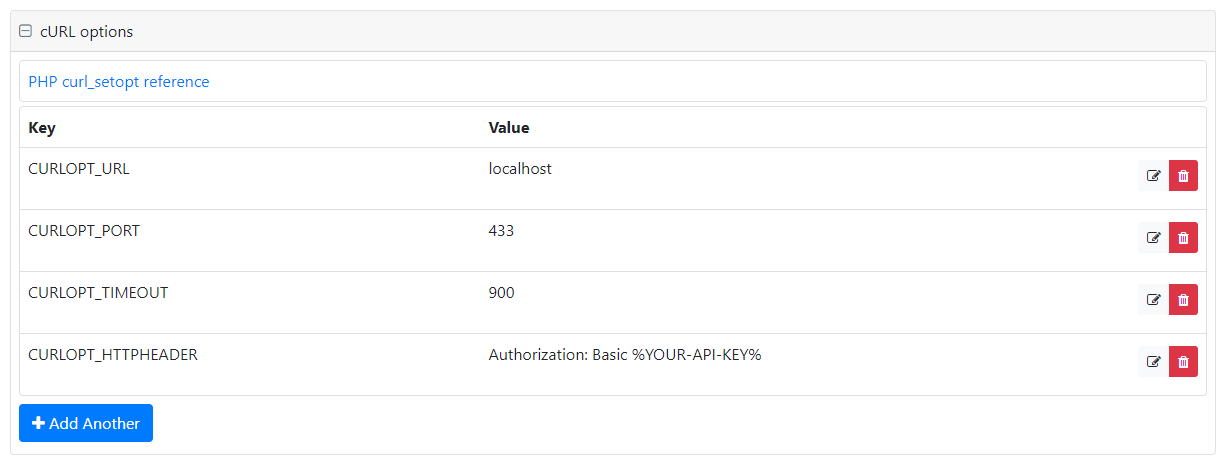
- cURL options PHP curl_setopt options, see cURL options.
- Cache Settings for connecting to a REDIS database that can cache the session state, see Cache.
- Certificate Settings for HTTPS connections, see Certificate.
- Application data Key value pairs that can be provided to the application during initialization, see Application data.
Python ownR
The Python ownR configuration has one specific setting that is not part of the above mentioned categories:
- function_name The ownR entry point function.
cURL options
To connect to the back-end server, cURL options can be specified. The options must be provided as valid PHP curl_setopt key-value pairs.

The values are categorized into five types:
- Array An array of string values.
- Boolean
- Number
- Text
- cURL Constant The name of a cURL constant, e.g. for CURLOPT_HTTP_VERSION you could specify CURL_HTTP_VERSION_2_0.
- File Contents The file contents value consists of three parts:
- File name The name under which the file will be saved on the server
- Base64 encoded To switch between Base64 encoded and plain text contents
- Value The actual file contents
To specify an option, fill in the Key and Type field. After selecting a type, the corresponding Value field will appear. Fill in the value and click OK.

When specifying Base64 encoded contents, use the raw encoding. For example example becomes ZXhhbXBsZQ==.
>> matlab.net.base64encode('example')
ans =

    'ZXhhbXBsZQ=='
>>> base64.b64encode('example'.encode('ascii'))
b'ZXhhbXBsZQ=='
Cache

The cache can be configured in three possible ways:
-
portal: Persistent data is cached on the portal server. This makes the back-end stateless and does not allow using the
setCacheandgetCachemethods. The required data will be sent to the back-end on each request, increasing network traffic. Files saved in the session folder will be deleted at the end of each call. -
file: Enables file-based caching on the back-end server. The cache location can be configured by setting an environment variable
SIMIAN_TEMP_FOLDERon the back-end to the path of a folder where the back-end (worker) has read and write access. If the environment variable is left unset, depending on the platform, a default location in the user data is used (e.g.%userprofile%or$HOME). Please note that on a server with multiple workers, the cache location must be shared between those workers to ensure that all workers have the same state. -
redis: Caches the data in a Redis database. The configuration of the redis cache is different for the various back-end servers.
-
MATLAB Production Server: Caching with redis can be configured in the MATLAB Production Server dashboard. After that, only one setting is required in the configuration:
- connection_name Redis connection name as configured on the MATLAB Production Server.
-
Python back-ends: The Python back-ends can be configured to connect to redis using the PyPi redis package. To connect, at least the following fields need to be specified:
-
host Host name of the redis server.
-
port Port on which the redis server runs.
Other fields are optional. See the project page for more information.
-
-
Certificate
The Certificate panel can be used to set up the certificates files on the back-end server, such that it can download and upload files from the portal via HTTPS.

Matlab Production Server
On the Matlab Production Server, the matlab.net.http.HTTPOptions class is used to set the CertificateFilename in the HTTP request.
When certificates are not enabled, then the validation of the server certificate is turned off. Matlab only verifies that the domain name of the server certificate matches that of the server. It is strongly recommended to enable certificates in a production environment.
When the Location is set to default, Matlab validates server certificates using the system-provided certificate store. Otherwise it must be a file path to a privacy-enhanced mail (PEM) formatted file. It is the responsibility of the Matlab Production Server administrator to ensure that the file can be found in the specified location.
Python back-ends
The Python back-ends use the requests module to verify SSL certificates for HTTPS requests.
When certificates are not enabled, requests will accept any TLS certificate presented by the server, and will ignore hostname mismatches and/or expired certificates. It is strongly recommended to enable certificates in a production environment.
The Location must be the path to a CA_BUNDLE file or directory with certificates of trusted CAs. It is the responsibility of the back-end server administrator to ensure that the file or directory can be found in the specified location.
If the Location is set to a path to a directory, the directory must have been processed using the c_rehash utility supplied with OpenSSL.
Set Location to True to use the installed certifi certificates bundle.
The list of trusted CAs can also be specified through the REQUESTS_CA_BUNDLE environment variable. If REQUESTS_CA_BUNDLE is not set, CURL_CA_BUNDLE will be used as fallback.
Application data
Application data can be passed to the back-end application, such that parameterized calls are possible. Key-value pairs can be specified for this purpose. There is no pre-defined format.

Add, remove, save and reset configurations
Add configuration
To add a configuration, click the Add configuration button. Fill in all mandatory fields and click OK. The new configuration will appear with status New. Save the configurations to make the change permanent.
Duplicate configuration
Existing configurations can be duplicated. Open the configuration you want to duplicate for editing and click the Duplicate button. The duplicated configuration will open for editing. At least the Application Slug must be changed to a unique value, before the configuration can be saved.
Remove configuration
To remove a configuration, open it for editing and select the Remove this configuration checkbox. Then, click OK. The status field shows Remove. The actual removal of the configuration takes place when the configurations are saved.
Save configurations
To save the configurations, click the Save configurations button. This will save all configurations with status New or Modified and remove all configurations with status Remove. Configurations with status Normal will not be saved, i.e. they remain as they are on the server.
N.B.: This action cannot be undone.
Reset configurations
To reset the configurations, click the Reset configurations button. This will discard all changes (New, Modified and Remove) and reloads the configurations from the server.
N.B.: This action cannot be undone.
Instances management
The Instances management panel lists all running instances, showing information about the application, user and activity.

Removing instances
An instance can be deleted using the trash button in the corresponding row. This makes a call to the back-end server to clean up its data for the instance and then removes the meta-data on the portal server.
It is strongly recommended not to:
- Remove instances that are busy.
- Remove instances running on a back-end server that is temporarily unreachable.
Front-end Management
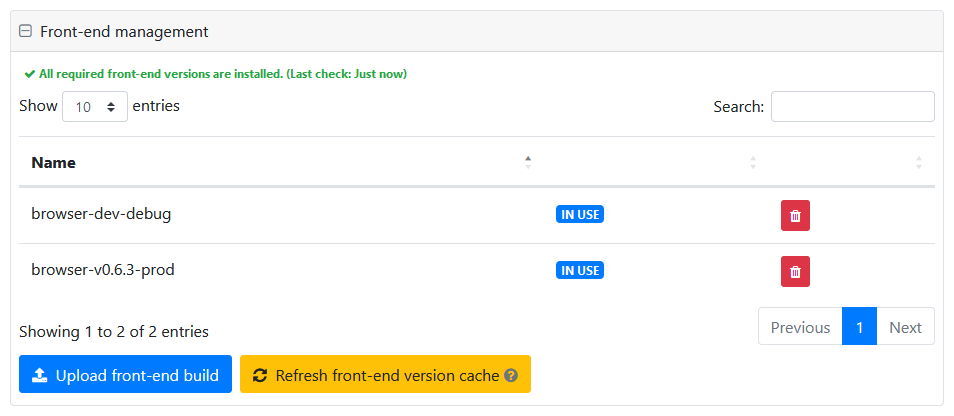
The Front-end management panel can be used to upload or remove front-end builds. The list indicates which front-end builds are in use.

Upload front-end build
To upload a new front-end build, click the Upload front-end build button. A file dialog prompts you for the location of the zip-archive containing the build. Select a file (we suggest to keep the original file name as provided by MonkeyProof Solutions) and click OK. When the file is successfully uploaded, a message is displayed at the top of the screen and the build is added to the list.
Remove front-end build
To remove a front-end build, click the trash button in the corresponding row. When the build has been removed, a message is displayed at the top of the screen.
N.B.: This action cannot be undone.
Front-end version cache
Each application can use one front-end version. This can be the front-end version override specified in the Configurations panel, or the front-end version that is configured in the application itself. In order to obtain the latter, it is necessary to make a call to the back-end server that hosts the application. Hence, to determine which front-end builds are in use, the admin portal keeps a cache of front-end versions that are in use for each application. Click the Refresh front-end version cache button to update the cache.
Logs
The Logs panel can be used to download server logs.

Downloading logs
To download a log file, first select the log type in the select box. Then, select the log file from the log instance select box and click the download button. A file dialog prompts for a location to save the file.
User and group management
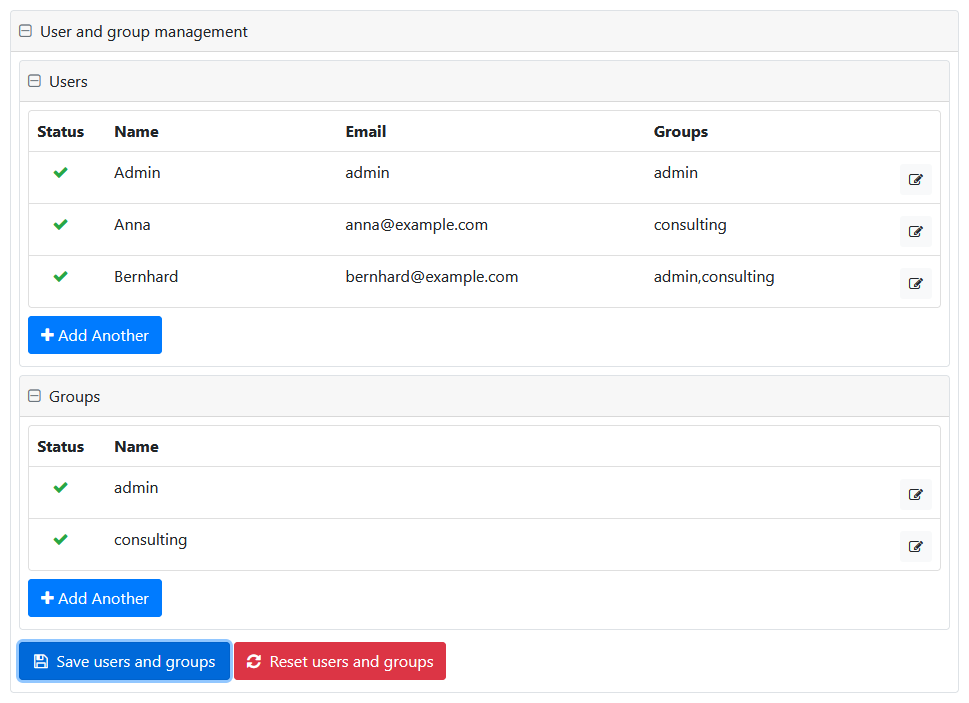
The User and group management panel can be used when the portal is configured for managed authentication (see the Install Guide for instructions).

User management
Adding users
To add a user click Add another and specify the following options:
- Name This is the name that will be displayed when the user is logged in.
- Email The email will be used as username.
- Groups The groups determine which application can be accessed. Users in the
admingroup can access the admin portal. - Photo (optional) Upload a (small!!) image to display when the user is logged in.
Then, click OK. The user will be saved after clicking the Save users and groups button.

Removing users
To remove users, open the user settings for editing, select the checkbox and click OK. The user will be removed after clicking the Save users and groups button. The user will not be able to open new application instances, effective immediately. However, applications that are already open remain functional.
N.B.: It is recommended to use the Instances management panel to terminate open applications.
An alternative to removing a user might be to clear their password by clicking the Clear pass button. This does not allow new logins from the user. If the user is signed in already, full functionality remains available.
Send invitations
Click the Send invitation to send an email to the user with a link that allows (re)setting the password for their account. The link expires in 24 hours.
Group management
Adding groups
To add a group, click Add another, specify a unique name and click OK.
The groups will be saved after clicking the Save users and groups button.
Removing groups
To remove a group open the row for editing and select the checkbox. Then, click OK.
The groups will be saved after clicking the Save users and groups button.
N.B.: When removing a group that is still in use by users and applications, they will not be updated and their access rights remain unchanged.
Maintenance
The mainenance panel contains buttons to activate and deactivate maintenance mode and to send a test email that aids in correctly configuring PHP mailer.
Maintenance mode can be used to block all interaction with the portal and applications, except for the admin portal.
The email test button tries to send an email to the specified address and logs errors in case it does not succeed.
